Most industrial coating failures have nothing to do with the paint itself; they are decided before the first brush or spray gun even touches the metal. It’s a hard truth that many project managers learn the expensive way when a high-value coating system begins to delaminate within months. Achieving professional steel surface preparation for painting isn’t just about removing visible rust; it’s a precise engineering process that dictates the chemical and mechanical bond of your protective layer. If the substrate isn’t prepared to the correct profile, even the most advanced epoxy will eventually fail.
We understand the frustration of deciphering complex ISO 8501 standards whilst trying to manage the logistical challenges of dust and environmental impact on a busy site. This guide will help you master the technical requirements and practical methods needed to ensure your industrial coatings reach their maximum lifespan. We will preview the latest AMPP standards, compare Sa 2.5 against Sa 3 cleanliness, and examine why choosing the right abrasive media is critical for both safety and performance. By the end, you’ll have the confidence to oversee your next project with the eye of a seasoned specialist who prioritises long-term integrity over a quick finish.
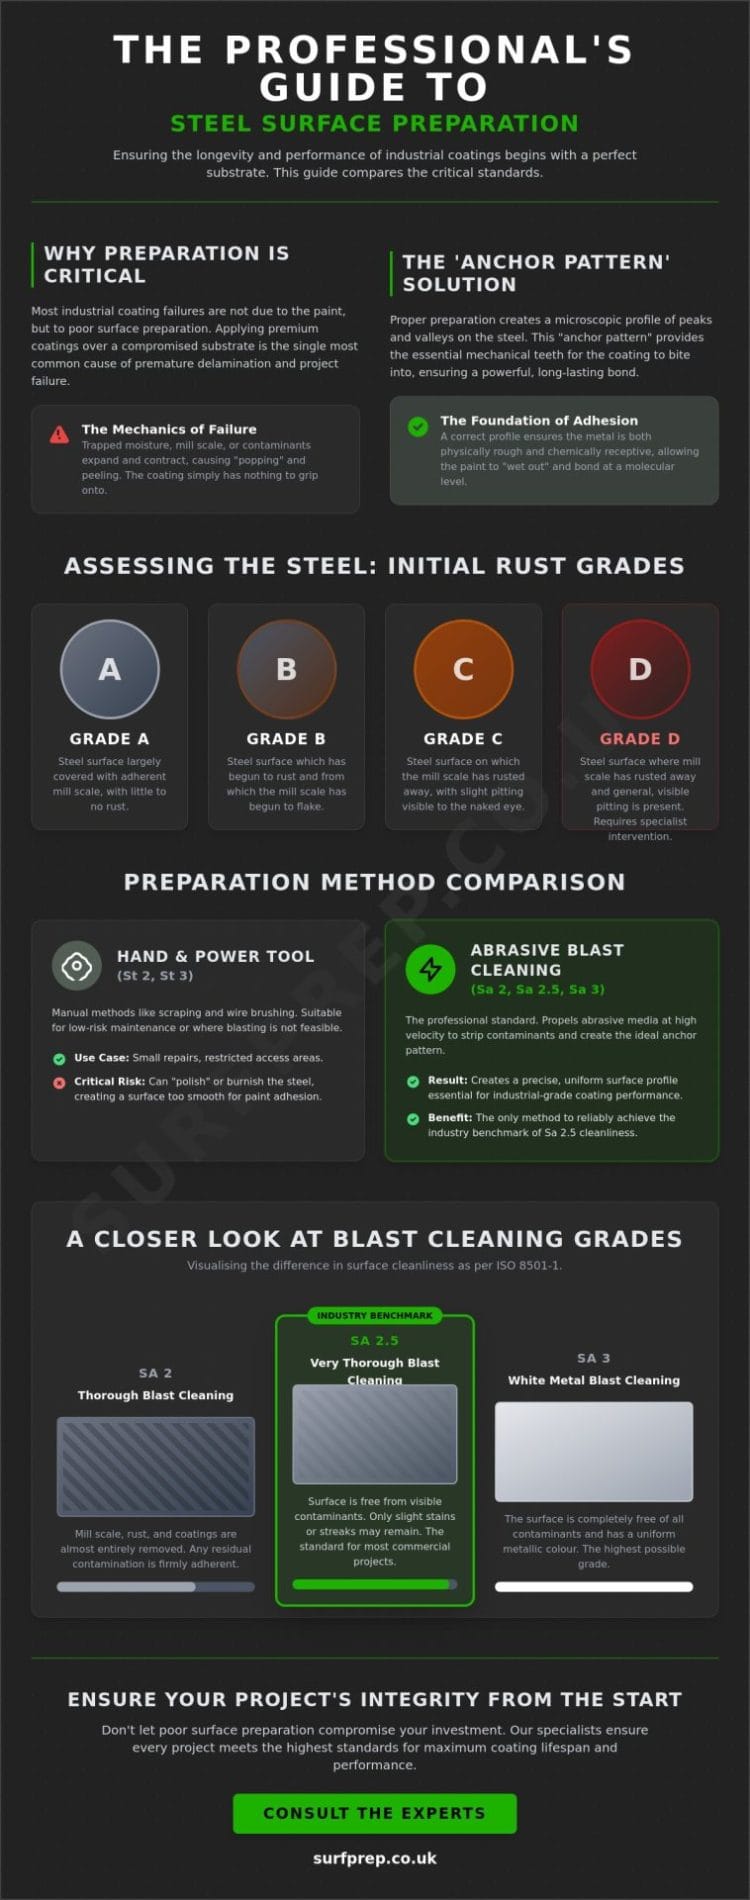
- Understand the “Anchor Pattern” and how specific mechanical modification of the substrate is the only way to ensure long-term coating adhesion.
- Master the distinction between manual (St) and blast (Sa) grades, focusing on why Sa 2.5 is the essential benchmark for steel surface preparation for painting.
- Learn how to manage the “flash rust” window by monitoring dew points and humidity levels within the unpredictable UK climate.
- Develop a logistical strategy for large-scale industrial projects in busy commercial hubs like Manchester or York, ensuring environmental compliance and site safety.
The Fundamentals of Steel Surface Preparation and Adhesion
Steel surface preparation for painting isn’t just a cleaning task; it’s the intentional mechanical modification of the substrate. Without it, you’re essentially painting on a layer of dust and loose oxides. The goal is to create an “Anchor Pattern.” This microscopic profile provides the “teeth” that high-performance paints need to bite into the metal. Without this mechanical bond, the coating sits on top like a sheet of plastic, waiting for the first temperature swing or physical impact to peel it away.
Here’s an honest admission from the field: we often see clients invest thousands in top-tier marine-grade epoxies only to see them fail within a year. It’s almost never the paint’s fault. Applying premium coatings over poorly prepared steel is the single most common cause of industrial project failure. You can’t compensate for a bad surface with a more expensive tin of paint.
To get it right, we look at BS EN ISO 8501-1, which categorises steel into four initial rust grades:
- Grade A: Steel surface covered with adherent mill scale.
- Grade B: Steel surface beginning to rust, where mill scale has started to flake.
- Grade C: Steel surface where mill scale has rusted away or can be scraped, with slight pitting.
- Grade D: Steel surface where mill scale has rusted away and general pitting is visible.
Grade D is particularly tricky; it requires specialist intervention because the deep pits trap contaminants that standard wire brushing won’t touch.
Initial Surface Conditions: Assessing Your Steelwork
Most new steel arrives with mill scale, that distinctive blue-grey layer formed during hot rolling. Whilst it looks solid, it’s an unstable base. It’s brittle and has a different thermal expansion rate than the underlying steel. Eventually, it will crack and take your paint with it. Professional Abrasive blasting methods are designed to strip this away entirely. We also have to watch for “invisible” killers like soluble salts, oil, and grease. Blasting alone can sometimes just drive these deeper into the profile if they aren’t degreased first.
The Mechanics of Coating Failure
Failure usually starts at the molecular level. If moisture or air is trapped under mill scale or within a deep pit, it expands, causing “popping” and delamination. There’s also the issue of surface energy. A surface might look clean to the naked eye, but if it’s chemically “lazy,” the paint won’t wet out properly. Effective steel surface preparation for painting ensures the metal is both physically rough and chemically receptive to the coating system.
Comparison of Preparation Methods and ISO Standards
Selecting the right method for steel surface preparation for painting depends entirely on the environment the structure will face. In the UK, we categorise these methods using ISO 8501-1, primarily splitting them into manual cleaning (St) and blast cleaning (Sa). Whilst manual scraping or wire brushing might seem cost-effective for small repairs, it rarely provides the profile needed for industrial-grade protection. It’s a different scale of work entirely; industrial surface preparation requires heavy-duty compressors and precise media control that you simply don’t find in domestic pressure washing equipment.
Abrasive Blast Cleaning (Sa 2, Sa 2.5, Sa 3)
Sa 2.5, or “Very Thorough Blast Cleaning”, is the industry benchmark for most UK commercial projects. It requires the surface to be free from all visible oil, grease, and dirt, with mill scale and rust removed to the point where only slight stains remain as spots or streaks. For those needing a deeper dive into the technicalities, steel surface preparation standards provide a cross-reference between ISO and the legacy SSPC/NACE equivalents now managed by AMPP.
Sa 3 (White Metal) is the gold standard, leaving the metal completely uniform in colour. We reserve this for the most aggressive environments, such as immersion tanks or offshore structures. In sensitive commercial environments, such as Manchester or Leeds city centre, we might utilise “dust-free” or vacuum blasting systems to maintain the Sa 2.5 standard without impacting neighbouring businesses or air quality.
Hand and Power Tool Cleaning (St 2, St 3)
Hand tool cleaning (St 2 or St 3) is sometimes “good enough” for low-risk maintenance or areas with restricted access. However, there’s a real risk of “polishing” the steel. Using a power wire brush for too long can burnish the metal, making it so smooth that the paint has nothing to grip. We always prefer a blast profile when the project budget allows for it, as the grit we choose, whether it’s chilled iron, garnet, or crushed glass, dictates the profile amplitude. Chilled iron is aggressive and excellent for heavy mill scale, whilst garnet offers a cleaner finish with less dust. If you’re unsure which standard your project requires, it’s always better to consult a specialist before the first blast pot is filled.
Site-Specific Implementation and Environmental Control
Working along the “Hull to Newcastle” corridor requires a deep respect for the North Sea climate. High relative humidity and shifting dew points create a narrow window for steel surface preparation for painting before flash rust takes hold. It’s a logistical challenge that many factory-based guides overlook. When we work in busy commercial hubs like Manchester or York, the task isn’t just about the blast; it’s about managing containment and spent abrasive recovery to protect the public and the local environment.
We’ve often seen projects fail because a contractor didn’t account for the damp Northern air. It’s far better to delay a shift than to blast steel that will oxidise before the primer can be applied. For a thorough site-specific assessment of your assets, you need a partner who understands these regional variables and won’t gamble with your coating’s longevity.
Managing the Preparation-to-Paint Window
The “4-hour rule” is the standard we live by. Once the steel is cleaned to Sa 2.5, the clock starts. If the surface temperature isn’t at least 3°C above the dew point, invisible moisture will settle in the profile. This traps corrosion under the paint, leading to the delamination issues we’ve already discussed. In enclosed industrial spaces, we can use dehumidification to control the climate, but on open sites, we prime as we go to lock in the cleanliness.
Quality Control and Inspection Post-Prep
Precision is non-negotiable. We can use “Testex” tape to measure the profile amplitude in microns, ensuring the paint has the exact “teeth” required by the manufacturer. We also carry out a “Dust Test” to ensure the steel is vacuum-clean before the first coat. This level of detail mirrors the care needed in brick restoration, where even minor contaminants can compromise the final finish. If the prep isn’t perfect, the project isn’t ready for paint.
Securing the Future of Your Industrial Steelwork
Getting the technical details right today prevents the costly delamination failures of tomorrow. As we’ve explored, successful steel surface preparation for painting depends on more than just removing visible rust; it requires a precise mechanical profile and strict adherence to Sa 2.5 standards whilst managing the unpredictable UK climate. Whether you’re overseeing a heritage restoration or a large-scale commercial build, the integrity of your coating system is only as reliable as the substrate beneath it.
At Surfprep, our team operates across the M62 corridor, from Hull to Manchester, bringing a proven track record in industrial and commercial projects. We utilise specialist superheated steam and grit blasting equipment to handle steelwork of any scale, ensuring every micron of the surface profile meets the manufacturer’s specification. We believe in doing the job properly the first time, providing the grit and expertise needed to protect your assets for the long term. If you’re ready to ensure your next project stands the test of time, you can contact Surfprep for an industrial surface preparation quote today. Let’s build a protective foundation that lasts.
Frequently Asked Questions
What is the difference between Sa 2.5 and Sa 3 standards?
Sa 2.5 allows for slight stains or streaks of mill scale to remain, provided they don’t cover a significant area. In contrast, Sa 3 requires the steel to be completely uniform in colour, with every trace of contaminant removed. Whilst Sa 2.5 is the benchmark for most steel surface preparation for painting projects, Sa 3 is typically reserved for high-risk immersion services or aggressive chemical environments.
Can I paint over mill scale if it’s not currently rusting?
It’s never advisable to paint over mill scale, regardless of how stable it looks. Mill scale is a brittle oxide layer that expands and contracts at a different rate than the steel beneath it. Over time, thermal movement causes the scale to delaminate, which inevitably leads to total coating failure. Removing it ensures your primer bonds directly to the base metal for long-term protection.
How does the surface profile (amplitude) affect paint consumption?
A deeper surface profile naturally increases paint consumption because the “valleys” of the anchor pattern must be completely filled. If the profile is too aggressive, you’ll need a much thicker layer of primer to ensure the “peaks” are properly covered. Failing to account for this can lead to pinpoint corrosion where the metal is left exposed through a thin coating.
Is grit blasting suitable for thin-gauge steel or will it cause warping?
High-pressure grit blasting can certainly warp thin-gauge steel through a process known as peening. The physical impact of the grit can stretch the metal’s surface, leading to permanent distortion or “oil-canning.” To prevent this, we often reduce our blast pressure or switch to a less aggressive media. It’s a situation where an honest specialist will admit when a different preparation method is safer for the substrate.
What environmental regulations apply to on-site steel preparation in the UK?
In the UK, environmental regulations primarily cover noise pollution, dust suppression, and the legal disposal of waste materials. If we’re removing old coatings, we must also account for lead-based paint regulations, which require specialised containment and disposal routes. Local councils in cities like Hull often have strict requirements for on-site work to ensure that dust doesn’t impact neighbouring businesses or residents.
How long can blasted steel be left before the first coat of paint is applied?
Blasted steel should ideally be primed within four hours to prevent flash rust from forming. In the damp Northern climate, moisture can settle on the reactive metal surface very quickly once the protective oxides are removed. If the steel is left unprotected for too long, or if the dew point shifts, the surface will require a sweep blast to bring it back to the required ISO standard before painting.
