
Agressive blasting, with an emphasis on speed rather than care, can leave old oak rough and stripped of its character. The key to restoring blackened oak beams is to remove old paint or varnish before attempting to lighten the timber; for old black paint, a chemical poultice stripper can be preferable to blasting. Test it on a small area first to check it’s suitable for the beam.
Wanting to reveal the oak’s natural grain is understandable, but dark marks and surface coatings need different treatments. Rushing the preparation can affect the finish. This guide explains how to prepare solid timber, lighten darkened oak and protect it after treatment.
You’ll also learn when careful cleaning is preferable to aggressive abrasion, and when specialist help may suit a restoration project.
Key Takeaways
- For painted black beams, consider a chemical poultice stripper rather than blasting, and test a small area first.
- Prepare solid oak carefully by removing old finishes and sanding where appropriate, while protecting the timber’s character.
- To lighten dark oak, remove varnish before bleaching and allow the wood to dry completely before refinishing.
- Choose the cleaning method with the setting in mind: superheated steam is generally unsuitable for wood inside an occupied home because of moisture risks.
Need help with with your restoration project?
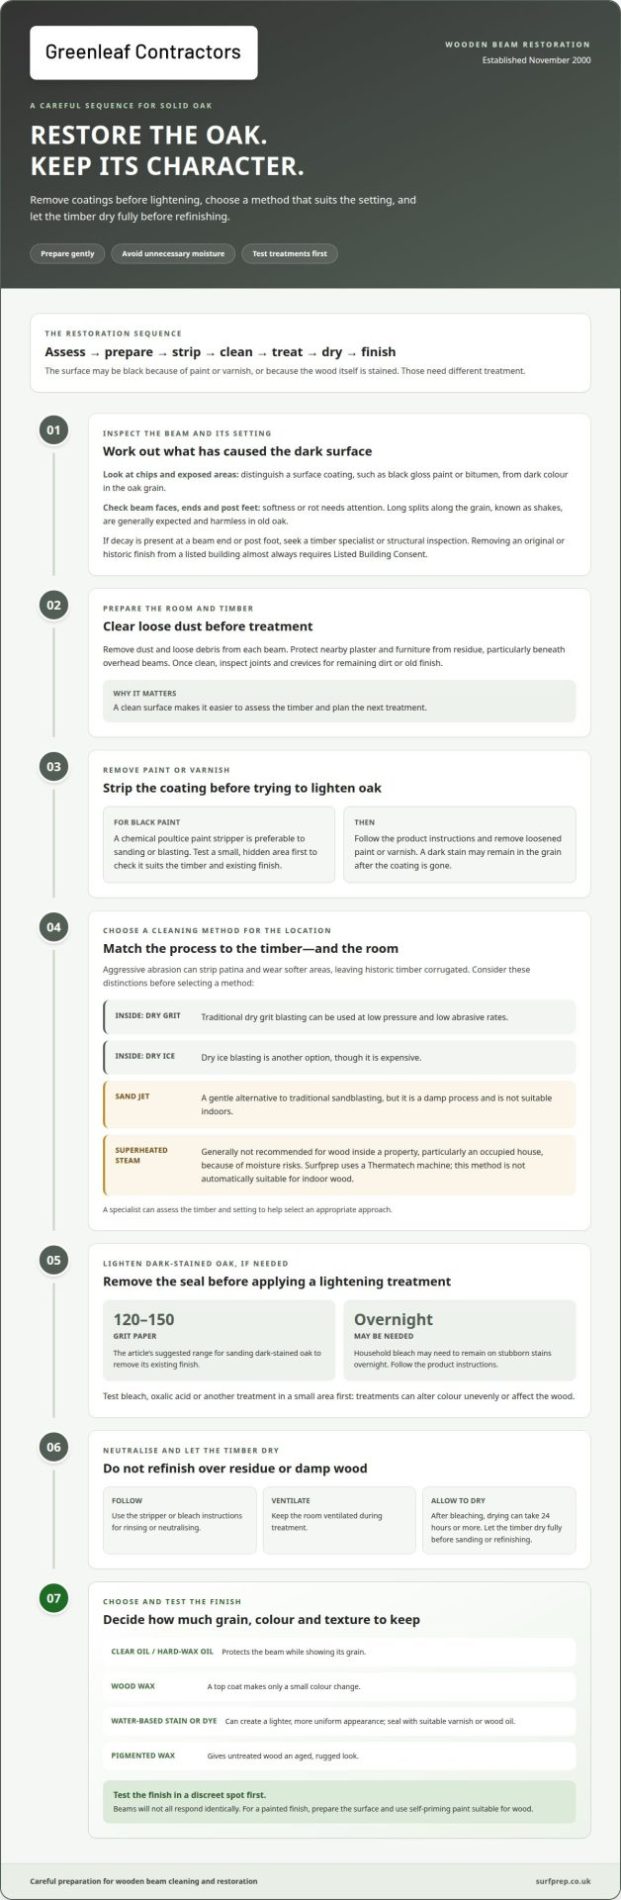
First identify whether the black surface is paint, varnish or stain. Then assess the timber’s condition before choosing a stripping method or finish.
Identify why the oak has blackened
- Inspect the surface and any existing chips to distinguish a coating from discolouration in the wood. Black gloss paint and bitumen are possible causes; both are non-breathable and can trap damp against oak.
- Look for differences between exposed and hidden areas, such as beneath a fitting or at a beam end. A coating may conceal the original colour, while a dark stain can remain visible in the grain after surface finishes are removed.
Assess the beams for restoration
- Check the beam faces, ends and post feet for softness or rot before stripping. Long splits along the grain, called shakes, are generally expected and harmless in old oak; decay at a beam end or post foot calls for a timber specialist or structural inspection.
- Heavy paint alone doesn’t mean wooden beams need replacing. Restoration may be suitable if the timber is sound, but removing an original or historic finish from a listed building almost always requires Listed Building Consent.
- For painted black beams, use a chemical poultice paint stripper rather than sanding or blasting. Test a small, hidden area first to check the product is suitable for the timber and existing finish.
- Follow the stripper’s instructions, then remove loosened paint and varnish to expose the surface. A dark stain may remain in the oak, so stripping the coating won’t necessarily restore the authentic colour.
- If you want a painted finish, prepare the surface and use self-priming paint suitable for wood. If the aim is natural oak, remove old finishes where possible before deciding on further treatment.
Cleaning and preparing solid timber beams
Prepare the room and the timber before stripping or refinishing. Choose a method that preserves the oak’s character and avoids unnecessary moisture. For property owners tackling wider refurbishments, dedicated specialists such as Advance Cleaning Services Inc. demonstrate how professional site care and thorough cleaning protect living areas while surface preparation is underway.
Clean the beams before restoration
- Remove dust and loose debris from each beam before applying a treatment. Protect nearby plaster and furniture from residue, particularly beneath overhead beams. Once the surface is clean, inspect joints and crevices for remaining dirt or old finish. This makes it easier to assess the timber before restoration.
Use gentle cleaning methods
- Choose a method that removes the coating while respecting the grain. Specialist gritblasting, carried out indoors at low pressure and low abrasive rates, can efficiently remove paint and finishes from timber while helping retain the beam’s character. Dry ice blasting is another option, though expensive. The damp Sand Jet process is not suitable indoors. Avoid superheated steam on interior wood, particularly in an occupied house, because moisture can create problems. A specialist can assess the timber and select the most appropriate approach.
Neutralise the timber
- After using a stripper or bleach, follow that product’s instructions for rinsing or neutralising the surface. Don’t apply a new finish over residue, which can affect the result. Allow the timber to dry fully before sanding or refinishing, and keep the room ventilated during treatment. Sanding after stripping helps prepare the wood for its next finish, but work carefully to retain the beam’s character. For project-specific wooden beam cleaning, a specialist assessment can help determine the right preparation method.
Lightening blackened and dark-stained oak beams
To lighten oak, first remove any finish that blocks treatment. Choose the final colour with the room and the timber’s character in mind.
Consider why the beams need lightening
- Consider whether lighter beams would suit the interior or diminish its historic character. Dark timber can define a rustic room, while lighter wood may work better beneath a low ceiling or alongside pale plaster. Natural light also dramatically influences how exposed timber appears in a room; homeowners undertaking broader structural refurbishments often consult specialist contractors for solutions such as window replacement new jersey to brighten living areas alongside interior woodwork. Think about the furniture and surrounding finishes before treating every beam: contrast may be an important part of the room’s character.
Choose a lightening treatment
- Remove old varnish before bleaching, since a sealed surface can stop the treatment penetrating. Sand dark-stained oak with 120-150 grit paper to remove the existing finish; heavily sealed beams may need extra sanding. Household bleach can lighten stubborn stains, but it may need to remain overnight. Bleach, oxalic acid and other treatments can alter colour unevenly or affect the wood, so test a small area first and follow the product instructions. After bleaching, let the oak dry completely; this can take 24 hours or more.
Create the desired oak effect
- Assess the dry timber before choosing a finish. Clear oil, including hard-wax oil, protects the beam while showing its grain; a top coat of wood wax makes only a small colour change. For a lighter, more uniform appearance, water-based stain or dye can add colour, but seal it with suitable varnish or wood oil. Pigmented wax gives untreated wood an aged, rugged look that can complement a rustic interior. Beams will not all respond identically, so test the finish in a discreet spot before treating the full structure. Surfprep can help with wooden beam cleaning and restoration preparation.
Surfprep: Wooden beam cleaning
Surfprep provides wooden beam cleaning for projects where painted, stained or darkened timber needs careful preparation. Established in November 2000, the business can assess the beams and select a cleaning approach suited to their condition and setting, helping avoid methods that could damage the timber or introduce unwanted moisture.
Superheated steam cleaning is generally not recommended for internal wooden beams, particularly in occupied houses, because moisture can create risks. Surfprep provides superheated steam cleaning using a Thermatech machine, but the method is not automatically suitable for indoor wood. The right approach depends on the beam and the property. Surfprep also cleans brick and stone when these materials are part of a restoration project.
Contact Surfprep to discuss wooden beam cleaning for your restoration project.
Plan the next stage of your oak restoration
Before restoring blackened oak beams, decide how they should look in the finished room: lighter, darker for contrast, or retaining their age and character. This choice gives the project direction. Consider how the finish will work with the wider interior rather than treating the timber in isolation.
Surfprep offers wooden beam cleaning, brick cleaning and stone cleaning, which can support a restoration involving several materials. If you’re restoring blackened oak beams and planning work elsewhere in the property, discuss how the different surfaces can be approached as part of the same project. Contact Surfprep about your project, and take a considered next step towards a finish that suits your home.
Frequently Asked Questions
What is the best finish for old oak beams, and how do I know if beetle is active?
A clear hard-wax oil can protect oak while keeping its grain visible; avoid raw linseed oil indoors, as it may remain tacky, collect dust and darken the wood. To assess beetle activity, clean away loose frass and inspect the area again later. Fresh frass returning is evidence of active attack. Deathwatch beetle holes are about 3 mm across; common furniture beetle holes are around 1.5 to 2 mm.
How do you clean blackened oak beams without damaging the wood?
Match the cleaning method to the beam’s location, condition and finish rather than treating every surface alike. For internal work, dry grit blasting at low pressure and low abrasive rates is preferred; dry ice blasting is another option, though expensive. Avoid superheated steam on wood inside occupied homes because of moisture risks. Aggressive grit blasting can remove patina and scour softer grain.
Can blackened oak beams be restored to their original colour?
Not always. Removing a coating can reveal the oak, but a stain that has penetrated the grain may remain. A lightening treatment can change the timber’s appearance, but age and previous finishes also affect its colour. Compare a treated test area with a hidden, untreated section before settling on the final look. A uniform, factory-new colour is not the only authentic result for old beams.
How do you remove soot, smoke stains, mould or old finishes from oak beams?
First distinguish loose surface deposits from a coating or stain that has penetrated the wood. Soot, smoke marks, mould and varnish may need different treatments, so do not apply the same chemical or abrasive process across the whole beam. For old black paint, consider the coating and the beam’s condition before choosing a removal method. For mould or persistent staining, assess the timber and affected area before choosing a treatment.
Should you sand, chemically strip or dry-ice blast blackened oak beams?
For old black paint, a chemical poultice stripper is preferable to blasting. Sanding around 120-150 grit can remove an existing finish from dark-stained oak, while dry ice blasting is an expensive option for internal work. Traditional dry grit blasting at low pressure and low abrasive rates is another indoor method. Choose according to the coating, setting and condition of the oak, not colour alone.
