Why Cleaning Wooden Beams is Essential Before Restoration
For owners of period properties, the sight of historic wooden beams is a source of immense character and pride. Yet, beneath layers of dark paint, wax, or soot lies a common threat: wood-boring insects. Before any restoration or treatment can begin, a thorough cleaning is not just an aesthetic choice—it’s a structural necessity. Effective preparation is the critical first step in protecting the very fabric of your building.
- Removing the Barrier: Decades of accumulated grime, from “black” soot and historic beeswax to modern varnishes and lead-based paints, effectively seal the timber’s surface. This barrier prevents essential treatments from reaching the wood.
- Enabling Treatment Penetration: For woodworm treatments (insecticides) to be effective, they must soak deep into the structural core of the beam. An uncleaned, non-porous surface will cause the fluid to simply run off, wasting time and money while leaving the infestation active.
- Accurate Damage Assessment: Cleaning allows for a clear distinction between superficial surface dirt and deep-seated organic growth or extensive woodworm damage, enabling a more accurate assessment of the timber’s condition.
- The “Expert Admission”: Whilst DIY sanding is a popular approach, it often proves counterproductive. The aggressive action can push old wax and dust deeper into the wood grain, further sealing the pores you need to open. It also creates significant airborne dust, which can be hazardous.
The Barrier Problem: Wax, Paint, and Porosity
Historic timbers were often treated with materials like beeswax or coated in layers of paint over the centuries. These coatings create a non-porous, almost waterproof “skin” on the wood. While this may have offered some surface protection, it creates a significant problem for modern restoration. Woodworm larvae (Anobium punctatum) thrive in the protected, untreated centre of these sealed beams. Any attempt to apply a liquid woodworm killer to a sealed surface is futile, as the very barrier you’re trying to bypass will prevent the treatment from ever reaching the pests.
Safety First: Dealing with Lead and Toxins
In UK homes built or renovated before the mid-1960s, lead-based paints were commonplace. These coatings are toxic and pose a serious health risk if disturbed improperly. Dry sanding or aggressive blasting can release fine lead particulates into the air, contaminating your property and creating a hazardous environment. Professional cleaning methods are designed to contain these toxic materials safely, protecting both the inhabitants and the integrity of the building. This is a crucial reason why DIY vs professional wooden beam restoration is a serious consideration; specialists are equipped to handle hazardous materials according to UK safety standards.
The Ultimate Checklist: Preparing Beams for Woodworm Treatment
A methodical approach to preparation ensures that your restoration project is safe, effective, and successful. Rushing this stage will compromise the final result and could lead to the failure of your woodworm treatment.
- Clear and Protect: The first step is to completely clear the work area. Remove all furniture, textiles, and valuables. Use heavy-duty sheeting to protect surrounding masonry, such as historic brickwork or lime plaster walls, from dust and debris.
- Identify the Timber: Determine the species of wood you are dealing with. Oak, Pine, and Elm are common in UK period properties, and each has a different density and grain. This identification is crucial for selecting the appropriate cleaning pressure and method to avoid damaging the wood’s surface.
- Remove Heavy Coatings: The primary goal is to strip the beams back to a porous state. This is best achieved using professional, gentle abrasive methods designed for internal use. These systems effectively remove paint, varnish, and wax without saturating the timber or surrounding structures.
- Conduct a “Water Bead Test”: Once the beams are cleaned, perform a simple test. Sprinkle a small amount of water onto the surface. If it beads up and sits on top, the wood is still sealed. If it soaks in quickly, the timber is now porous and ready for treatment.
Environmental Controls and Dust Management
When working inside a property, especially in confined spaces like attics or barn conversions, managing the environment is paramount. Professional restoration specialists use industrial-grade extraction systems to capture dust at the source, preventing it from migrating into other rooms or settling on surfaces. This is not only for cleanliness but also to prevent moisture from being drawn into sensitive materials like historic lime plaster, which can be damaged by sudden changes in humidity.
Moisture Content and Drying Times
After any cleaning process, it is vital to ensure the timber is sufficiently dry before applying treatments, particularly oil-based woodworm fluids. Applying treatments to damp wood can trap moisture, leading to rot, or prevent the fluid from absorbing correctly. A professional will use a moisture meter to get an accurate reading, verifying that the beam’s moisture content is at an acceptable level (typically below 20%) before proceeding to the next phase of restoration.
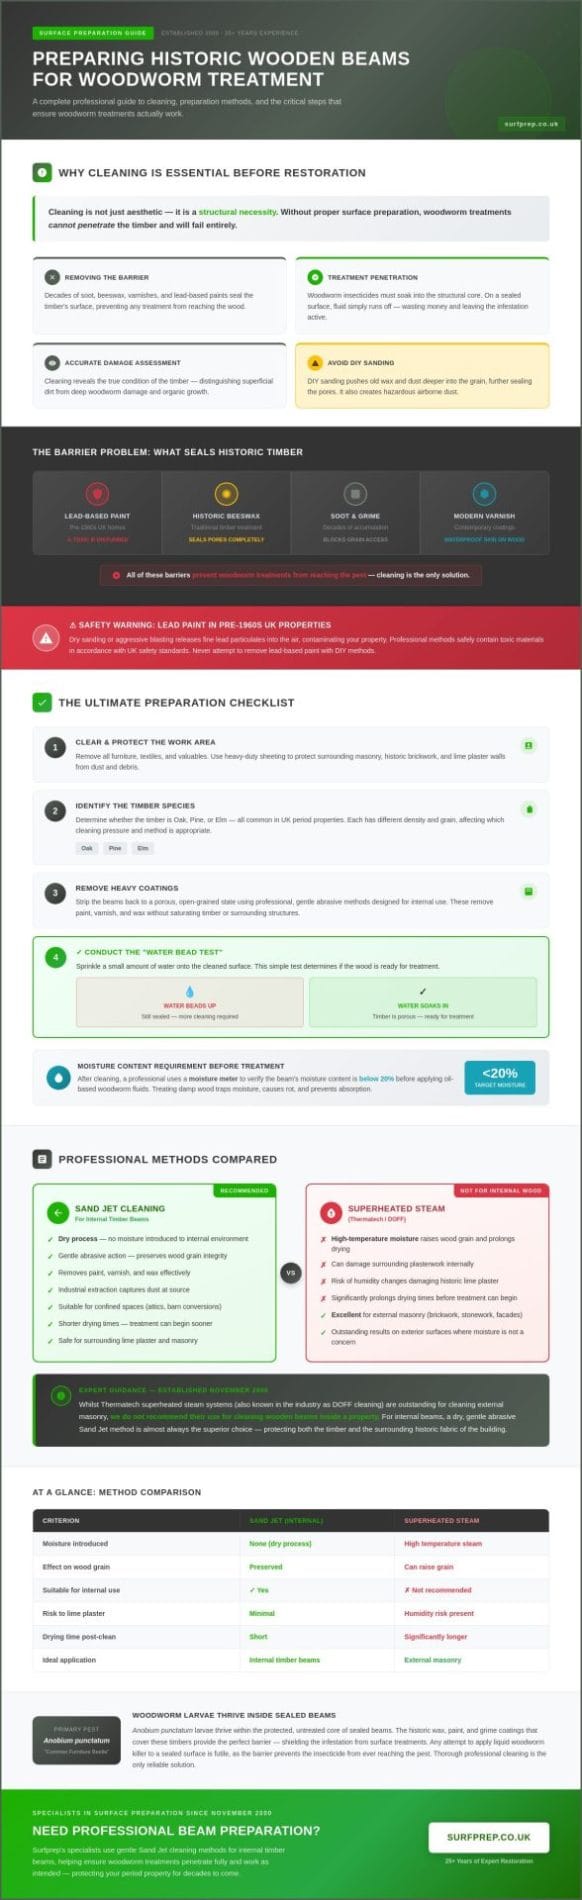
Professional Methods: Sand Jet Cleaning vs Superheated Steam
When it comes to removing coatings from historic timber, not all methods are created equal. As specialists in surface preparation since November 2000, we have found that choosing the right technique is essential for preserving the integrity of the wood. The two leading professional systems are gentle abrasive cleaning and superheated steam.
The “Expert Admission”: Whilst superheated steam systems like Thermatech are outstanding for cleaning external masonry, we do not recommend their use for cleaning wooden beams inside a property. The introduction of high-temperature moisture into an internal environment can lead to issues with surrounding plasterwork, raise the grain of the wood, and prolong drying times significantly. For internal beams, a dry, gentle abrasive method is almost always the superior choice.
The Role of Sand Jetting for Internal Beams
For internal timber restoration, the Sand Jet system is our recommended method. This is not the aggressive “sandblasting” of old; it is a precision-engineered, low-pressure system that uses a fine, inert abrasive mixed with a vortex of air.
- When to use it: It is the ideal solution for removing stubborn limewash, multiple layers of paint, or hard varnishes from internal oak or pine beams.
- How it works: The gentle abrasive action scours away the surface coating without pitting or damaging the underlying wood. Because it is a dry process, it creates no moisture issues for the timber or the surrounding structure.
- Professional Calibration: A skilled operator can precisely calibrate the pressure and abrasive flow to suit the timber type. This prevents the “fuzzy” or splintered texture that can be caused by overly aggressive DIY blasting, preserving the wood’s natural patina and character. For a deeper look at removing coatings, our guide on how to remove paint from structural wooden beams offers further insights.
When to Choose Superheated Steam (Thermatech)
Superheated steam systems, such as our Thermatech machine (often referred to by the well-known brand name DOFF), heat water to 150°C. This creates a powerful steam that can melt wax and lift paint from surfaces with minimal pressure.
- Ideal Applications: This method excels on robust, external surfaces like brick, stone, and occasionally, external structural timbers such as oak-framed porches.
- Benefits: The low pressure and high heat are effective at killing organic growth like algae and lifting certain types of paint without chemicals.
- Internal Limitations: As stated, the high moisture output makes it unsuitable for most internal restoration projects, where containment and the protection of adjacent sensitive materials are a priority.
While superheated steam is restricted to external use in timber restoration, it remains a leading method for maintaining other areas of the home; for example, companies like Best Carpet Steam Cleaning Melbourne demonstrate how professional steam cleaning can be safely applied to carpets and soft furnishings.
Ultimately, preparing wooden beams for restoration is a critical task that dictates the success of any subsequent treatment. By focusing on creating a clean and porous surface with the correct professional method, you ensure that your investment in woodworm treatment is effective, protecting the structural integrity and historical character of your property for years to come.
Ready to prepare your beams for restoration? Contact our restoration specialists for a beam cleaning quote and expert advice tailored to your property.
Frequently Asked Questions (FAQs)
Can I apply woodworm treatment over painted or varnished beams?
No. Applying woodworm treatment over a sealed surface like paint or varnish is ineffective. The fluid cannot penetrate the non-porous barrier to reach the timber core where the larvae live. The beams must be professionally cleaned back to bare, porous wood first.
Is superheated steam cleaning safe for 18th-century oak beams?
For internal 18th-century oak beams, we would strongly advise against it. The risk of introducing moisture into the property and potentially damaging the wood grain or surrounding plaster is too high. A gentle, low-pressure abrasive system like Sand Jet cleaning is a much safer and more effective method for interior heritage timber.
How long does it take for beams to dry after professional cleaning?
Drying time depends entirely on the method used. With a dry method like Sand Jet cleaning, there is no drying time required, and woodworm treatment can often proceed immediately. If a water-based method were used (which we don’t recommend internally), drying could take several days or even weeks, depending on ventilation and humidity, and would need to be verified with a moisture meter.
Will cleaning the beams reveal more woodworm damage than I can see now?
Yes, this is very likely. Layers of dark paint and grime are excellent at hiding the tell-tale exit holes and fine dust (frass) associated with a woodworm infestation. A thorough cleaning provides a clear view of the timber’s true condition, allowing for a full and accurate assessment of the extent of any damage before treatment begins.
